


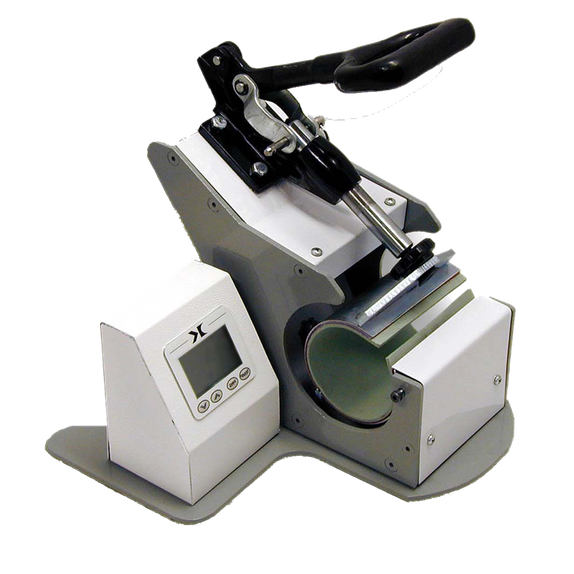
What is it?
The DK3 Digital Mug Press is a specialty press, exclusively for pressing mugs. This press is a full wrap-around, handle-to-handle, top-to-bottom printing mug press. It can press images up to 5" high, and as close as 1/2" from the handle, depending on the mug size.
What does the Makerplace provide?
- DK3 Digital Mug Press
- Teflon sheets
- Butcher Paper
- Hot pads
What do I need?
- A mug
- A design created with the Cricut Maker or Silhouette Cameo machine using Cricut Infusible Ink or a design printed on the Makerplace's Sublimation Printer.
- Cricut Infusible Ink only works with some ceramics
How do I use it?
- Turn on the heat press using the Power switch on the back, right-hand side of the machine.
- Set the desired temperature by pressing the Temp button and then using the up and down arrows to reach desired temperature. Press the Temp button again.
- Set the desired heating time by pressing the up and down arrows to reach desired length of time (in seconds).
- Adjust the pressure using the pressure knob to accommodate the size of the mug.
- When the heat press reaches the desired temperature, it is ready to go.
- Attach infusible ink design in position using heat resistant tape.
- Place the mug into the heat press.
- Pull handle down into position until it locks. Timer will start to count down.
- When timer beeps, release handle to lift press.
- Follow directions for materials to remove transfer papers.
What materials can I use?
- You can find materials at Cricut.com, Michaels, Jo-Ann, Amazon, and more
- Cricut recommends using Cricut Infusible Ink Blanks for designs using Infusible Ink
More resources
- How to Use DK3 Digital Mug Press
- Introduction to the DK3 Digitial Mug Press
- DK3 Digital Mug Press Instruction Manual
Tips & Tricks
Cricut Infusible Ink
Cricut Infusible Ink bleeds into the fabric or ceramic material for a soft, long-lasting design.
- Cricut Infusible Ink only works with certain ceramics.
- Cricut Infusible Ink Blanks include a t-shirt, tote bag, and baby onesie.
- Only certain ceramics, like dye-sublimation mugs work with Infusible Ink designs.
- Parchment paper is necessary for Cricut Infusible Ink designs, so the ink does not bleed onto the heat press.
- Heat resistant tape, which can be bought from Cricut, is also necessary for securing the design and parchment paper.
- Non-heat resistant tape can ruin your ceramic.